Thursday 31 July 2014

Tatting Away II

Pin It now!
TATBiT’s
Tatted Dandelion Chain Link Bookmark


The buzz, the refrain in the tatting community at present seems to be “Teri is back, Teri is back…” ! And she’s back with her bountiful goodies of free patterns, video tutorials, tatting tales galore !

I choose this beautiful Dandelion Chain Link Bookmark as my first Teri Dusenbury project. It is a free download in pdf format (click on link; this particular pattern is mid-way down the page, done in beautiful pink), with detailed instructions, explanations, diagrams, & written pattern.


Thread used : Anchor Mercer Crochet Cotton, size 20.
Black
Yellow : 0289
Green : 0229
Measurements : 9 inches long ; 2.2 inches wide.

A scanned image of  TATBiT's Dandelion bookmark

My Jottings  

Some terms & their equivalents :

Directional Ring (DR) ~ front side/back side tatting (FS/BS)
Double Knot (DK) ~ double stitch (ds)
Larks Head Knot (LHK) ~ reverse stitch (rs) or 2nd half of Split Ring method.
Split Quadruple Directional Ring (SQDR) ~ Floating / thrown rings or rings on ring. But here, one works with a Split Ring (therefore reverse stitches) from which 5 directional rings are thrown off.
~ өӨОӨө ~

Black color used for chain links. For the filler chain segments, I ended the last ring as an SSSR (single shuttle split ring) in order to hide the ends.
I added a small SSSR of 10ds at the very end to again hide tails And also to insert & tie a tassel later (I love tassels).

~ өӨОӨө ~

Since dandelion flowers are yellow, the ‘petals’ or florets were done in yellow, & stem & leaves in green. Now here was the dilemma ! I had wanted green for the ‘calyx’ as well, but my skill levels were found wanting, even though I tried a few techniques.
Finally, I settled for an all-yellow petal & base.
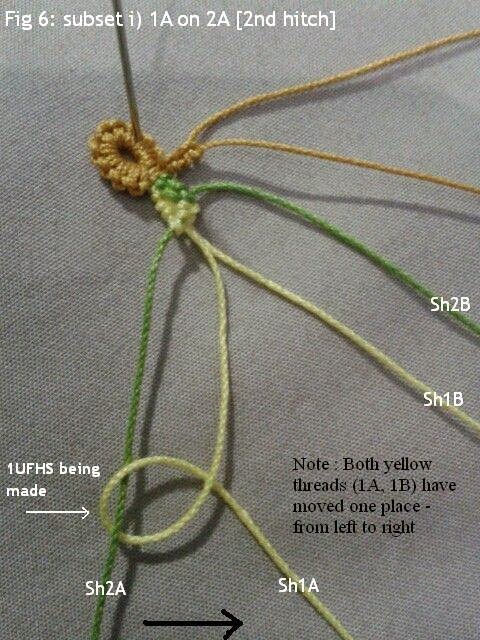
However, while starting the yellow SQDR, the green thread was encapsulated & hidden within the yellow, so that later, there would be continuity of pattern, when the flower part got over. Thus, 
Shuttle 1 & 2 : yellow CTM. For SQDR center & DR petals.
Shuttle 3 : green. Encapsulated till required later for stem & leaves.
~ өӨОӨө ~

This was the first time that I have actually done FS/BS tatting where it Really mattered ! And I kept forgetting to start the directional ring correctly, leading to unknotting the 1st couple of stitches almost every time ;-(
Another realization : It becomes essential to post shuttle in DR or FS/BS rings ! The 2nd ring in dandelion A has curled slightly since shuttle was not posted to front of work before continuing.
~ өӨОӨө ~

When joining the DR petals, join to chain link from Back of work, since one is already working on the BS in a DR.
And the join is a downward or Down join, in order to avoid color blips.
~ өӨОӨө ~ 

Once the SQDR was closed, I cut off one of the yellow threads, (hiding the tail inside the next few stitches), & continued with only one yellow thread as core & green as the working thread.

SLTs (shoe lace trick) were required when tackling the leaves from the stem because the core thread was yellow.
~ өӨОӨө ~ 

The dandelions are tatted in an counter-clockwise direction ! So it needs a bit of getting used to.
I do wonder whether it can be done in a clockwise fashion, using SCMR (Self Closing Mock Ring) for center, with thrown rings for petals. I hope to try this out sometime, although it did not work out with 2 colors.
From my own failed attempts, I realized what an intelligent & clever pattern this was and why the need for an anti-clockwise and directional tatting ! It has increased my learning manifold, opening up the tatting field for me. I challenged myself to do the dandelions in 2 colors & am pretty happy with the result so far. Thoroughly enjoyed the whole experience from start to finish ! And there are so many many more patterns, that one doesn't know which to choose next ...
~ өӨОӨө ~


~ өӨОӨө ~

Before signing off, here's an amazing  Time Lapse Dandelion flower to seed head film by Neil Bromhall that I'm sure you will enjoy :-) It is a very short 1.41 min film only.

~ өӨОӨө ~

Motif # 10 for 25 Motif Challenge

Wednesday 16 July 2014

Mac-Tatted Braid (written pattern)

Pin It now!
a free 6-shuttle adapted pattern


Yes, I can hear the deep sighs of my handful of readers ..." what, not again ?!!!" 
I promise - this is the last in this "series" ;-)  

I have already written 2 posts on this braid. Twist Work in Reverse Stitch (TwW) is a handy pictorial to read through before actually starting to tat this pattern.
Mac-tatted Braid/Bracelet is a detailed effort to put across the 6-shuttle pattern via step-by-step pictures as well as an all-encompassing Table that acts as the pattern sequence.
However, I have come across suggestions & discussions in InTatters where the visually challenged prefer written instructions rather than notations & pics. This, therefore, is an attempt at the same. It is also a more compact, written-out pattern that is hopefully easy to follow & definitely easy to print. And one can always refer back to the previous 2 posts in case of doubts.
It is a reworking of the original instructions that Usha sent me. Here is Usha's original braid photo again -


Abbreviations used :
CTM : continuous thread method
rs : reverse stitch
TwW / TwW in rs : Twist Work in reverse stitch (click on link for step-by-step tutorial)


Important Points :
  • All stitches are rs (reverse stitch) only.
  • All caps of rs face downwards Always.
  • TwW means to twist work a 180degree in rs (step-by-step tut) by passing working shuttle Under core thread, then starting the rs. (since all stitches in this braid are rs, I will refer to ‘TwW in rs’ simply as TwW.
  • There is no crossing-over between shuttles of same color (ie between A & B).
  • Always push the stitches back on the core thread after they are made.

To Start :
a) Wind 3 Colors in 6 shuttles, CTM optional
Color 1 in shuttles 1A &1B
Color 2 in shuttles 2A & 2B
Color 3 in shuttles 3A & 3B
b) Knot up all the six threads or make an encapsulated loop for bracelet as in video or add a finding/ring, etc.
c) Make 2 rs of each color on it’s own core thread. Thus all 6 threads with 2 rs will lie flat, side by side.
Sequence of threads (from left to right) at start will be : 1A , 1B , 2A , 2B , 3A , 3B

Pattern :

  • Working from left to right,
I. Start with 1B, TwW in rs, & make 1rs on 2A as core thread. Then take 1A, TwW, 1rs on 2A. (2rs in a row with both shuttles of color 1 on 2A)
II. Repeat Step 3, but using 2B as core thread. Hence, 1B on 2B, then 1A on 2B (2rs in a row with both shuttles of color 1 on 2B)
There are now 4rs of color 1 (visible) on color 2 (hidden). Shuttles 1A, 1B are now over shuttles 2A, 2B, having moved from left to right; these are now in the center.

The sequence after Steps I & II : 2A , 2B , 1A, 1B, 3A , 3B

  • Working from right to left,
III. Now with 3A – TwW, 1rs on 1B ; with 3B – TwW, 1rs on 1B (2rs of color 3 on color 1)
IV. With 3A – TwW, 1rs on 1A ; with 3B – TwW, 1rs on 1A.
There are now 4rs of color 3 (visible) on color 1 (hidden). Shuttles 1A, 1B are now over shuttles 3A, 3B, having moved to extreme right. Color 3 is now in the center.

The sequence after Steps III & IV : 2A , 2B , 3A, 3B, 1A , 1B

Steps I to IV form the very core of the pattern in terms of technique, & are repeated unchanged, Except for the color of threads being used as working & core.

  • Working from left to right,
V : Repeat Step I using color 2 as working thread & color 3 as core. Make 2 rs using 2B on 3A, & 2A on 3A. Remember to TwW before each rs.
VI : Repeat Step II : Make 2 rs using 2B on 3B, & 2A on 3B. TwW before each rs.
There are now 4rs of Color 2(visible) on Color 3 (hidden).

Sequence after these 2 steps : 3A , 3B , 2A , 2B , 1A , 1B

  • Working from right to left,
VII : Repeat Step III using color 1 as working thread & color 2 as core. Make 2 rs using 1A on 2B, &  1B on 2B. TwW before each rs.
VIII : Repeat Step IV : Make 2 rs using 1A on 2A, & 1B on 2A. TwW before each rs.
There are now 4rs of Color 1 (visible) on Color 2 (hidden).

Sequence after these 2 steps : 3A , 3B , 1A , 1B , 2A , 2B

  • Working from left to right,
IX : Repeat Step I using color 3 as working thread & color 1 as core. Make 2 rs using 3B on 1A, & 3A on 1A. TwW before each rs.
X : Repeat Step II : Make 2 rs using 3B on 1B, & 3A on 1B. TwW before each rs.
There are now 4rs of Color 3 (visible) on Color 1 (hidden).

Sequence after these 2 steps : 1A , 1B , 3A , 3B , 2A , 2B

  • Working from right to left,
XI : Repeat Step III using color 2 as working thread & color 3 as core. Make 2 rs using 2A on 3B, & 2B on 3B. TwW before each rs.
XII : Repeat Step IV : Make 2 rs using 2A on 3A, & 2B on 3A. TwW before each rs.
There are now 4rs of Color 2 (visible) on Color 3 (hidden).

Sequence after these 2 steps : 1A , 1B , 2A , 2B , 3A , 3B


These 12 steps form the first Set of stitches / repeats. 
The color sequence is back to where we started – 1 , 2 , 3 – after completing Steps I-XII.

Continue to desired length.


To add some novelty to this post, here's a close-up of the macrame Chevron Stitch that I tried on the same braid, by adding 2 more colors ! What can I say, I was enjoying myself ;-)))
And before continuing with the mac-tatted braid again, I Roll Tatted the additional threads on both sides, then tied & cut off.


Happy Mac-Tatting :-))

Monday 14 July 2014

Mac-Tatted Braid Pattern

Pin It now!
Macrame Pattern converted into a 6-shuttle Tatting pattern

Usha Kota has cleverly converted a macramé bracelet pattern into tatting and that too using 6 shuttles !!!
She was challenged to try something new with reverse stitch in the thread started by Judith Connors  in  InTatters, & when she came across this Football Bracelet video, all she could see were reverse stitches being made ! The experimenter in her got to work & we now have her wonderful transition of a macramé pattern into tatting.
My sincere thanks to Usha for kindly sharing her experiments & process. It has opened the doors to more inter-craft conversions/adaptations.  Changing the direction of reverse stitches to accomplish the macramé effect was brilliant !

Okay, initially, I got my brain all addled coz, with my rudimentary school-girl knowledge of macramé, I could see Both a macramé hitch knot as well as a hitch of rs. Then, I kept the video running & followed the macramé style. Once I got my head around the color sequence, I reverted to some of the instructions sent by Usha & it all fell into place easily. So my pictorial below is an interpretation & combo of the two. Only Usha can tell whether she followed the exact same method as outlined below, or did something a bit different … We’ll be waiting ;-))


6 shuttles required
Each Set / repeat measures about ¾ inch in length & less than ½ inch in width done in size 20 thread.
Threads Used
Anchor Mercer Crochet, 4054. Size 20
Yellow – 0289
Cadmium Orange – 0307
Mehandi Green – 0256
TIP : Best with size 10 thread or larger for the stitches & wave pattern to be highlighted …

Abbreviations Used:
rs / RS – reverse stitch
ds – double stitch
CTM – continuous thread method
Sh – Shuttle
USHS – Unflipped 2nd half stitch
UFHS – Unflipped 1st half stitch

A few words before the actual pattern :
  • Some of the images are a bit hazy. I just couldn’t get them aligned properly or sharp & clear :-(
  • It is best to view the images in sequence Along with tabulated instructions, so that if there is some ‘twisting/turning’ of the previous segment/stitches while photographing, it won’t matter.
  • The braid is pinned in some images only to photograph it better & make it easier to handle/lay flat.
  • It might be a good idea to view the Macrame School video for convergence of procedure.
  • I also recommend going through my detailed pictorial on how to twist work in reverse stitch before attempting this tatting.
  • I have tried to keep textual instructions at a minimum since the images, notations, & the tabulated data/sequence are self-explanatory. This might look like overkill with the pics and table. But there are all kinds of learners with different learning styles …. 
  • It is not as difficult or lengthy as it looks, once the 1st two subsets are under your belt. In fact, the weaving was such fun that I could just keep going – almost mesmerizing !


To Begin : 

Load 6 shuttles with 3 colors in 2 shuttles each. I wound them CTM, but this is optional.
Color 1 : Yellow in Sh1A & 1B ;
Color 2 : Green in Sh 2A & 2B ;
Color 3 : Orange in Sh 3A & 3B
   
As in the video, I did an encapsulated chain of 10 rs, using 
Color 3 over the other 5 threads. Then a square knot is tied at end to make ring. This step is optional, or can be changed as per requirements. Fig 1.
Make 2 rs of each color on it's own core thread (same color). All 6 threads with 2 rs ( 3                                                                  colors) will lie flat, side by side. Fig 2.

Figs 3-10 below, show the detailed process of making each half hitch of a rs ie. subset i) in table.
Starting from left side, move Sh1B under core Sh2A, then make over-under wrap for 1st hitch, ie. 1USHS. Fig 3.
Figs 3 - 6 show 2 rs in yellow made on one green core thread.
Figs 7-10 show next 2 rs in yellow made on other green core thread.

TIP : Whenever starting a new working thread, pass the shuttle Under the core thread (called TwW in rs); then commence the 1st half of rs ie. USHS.
This is an essential step in order also to Move the working thread from left to right (or right to left as case may be). Objective is to shift/move colors in relation to each other, in a sequence, And to keep the caps of all rs facing in one direction viz. downwards.


Subset i) of Set I has been completed. Yellow (Color 1) has moved from positions from left to right. 4rs of yellow made on green. 

Now to start working from right to left, in subset ii), using orange as working thread & yellow as core thread. Refer Figs. 11-15. Figs 11-14 show each half stitch being made of 2rs. I skipped photographing the next 2rs (3A on 1A & 3B on 1A) because they follow the exact same pattern as the previous 2 rs. Fig 15 shows the completed subset ii with 4 rs & shift in thread sequence.


Next, Figs 16, & 17 show the start of subset iii. Images of each step are not shown henceforth.
Fig 18 shows the first 3 subsets completed. 
Figs 19, 20, 21 show the next 3 competed subsets (iv, v, vi) & Fig 22 shows a close-up of repeats/Sets.
.


A Few Points to Remember

  • Always start with working thread Below/Under the core thread, when starting a new color. I prefer going under, since it seems to give a proper rs visually; the tiny bit of TwW thread remains hidden on wrong side.
  • All caps face ‘downwards’, always. Hence, when changing direction, TwW is important.
  • Black Arrows indicate direction of tatting. Left to right alternates with right to left between subsets.
  • Each rs needs to be snugged/tensioned tightly back on the core thread , as seen in the video.
  • In the table, the background color of rows indicates which color rs will be visible when working that subset.
  • Note that each core thread will have 2 rs - one from each shuttle of previous/adjacent color ; thus, finally, there will be 4 rs of one color on the 2 threads of adjacent color.
  • The color with which 4 rs are made (working thread), will be hidden in the next subset – it will become the core thread.
  • Complete repeat involves subsets i to vi & is termed Set I  (refer table). One can make as many repeats (Sets) as required for desired length.
  • Basically the Tatting technique involves a repetition of subsets i & ii : first moving from left to right to make 4 rs, then moving from right to left to make 4 more rs. Once you get familiar with the method involved in these, the rest of Set I is simply a matter of putting the sequence of colors in right order.

Table of Tatting Sequence for Mac-Tatted Braid/Bracelet


SET  I
4 rs made in each color Working thread on
core thread

Color
seen

Color
hidden

Direction of shuttle movement

Sequence of colors
Working Sh
Core Sh
At  Start
At End
i)  Y on G
Sequence of each rs


Color 1
on
Color 2
1B
2A

1

2

Left to Right

1, 2, 3

2 , 1 , 3
1A
2A
1B
2B
1A
2B
ii) O on Y


Color 3
on
Color 1
3A
1B

3

1

Right to Left

2 , 1 , 3


2 , 3 , 1
3B
1B
3A
1A
3B
1A
iii) G on O


Color 2
on
Color 3
2B
3A

2

3

Left to Right

2 , 3 , 1

3 , 2 , 1
2A
3A
2B
3B
2A
3B
iv) Y on G


Color 1
on
Color 2
1A
2B

1

2

Right to Left

3 , 2 , 1

3 , 1 , 2
1B
2B
1A
2A
1B
2A
v) O on Y


Color 3
on
Color 1
3B
1A

3

1

Left to Right

3 , 1 , 2

1 , 3 , 2
3A
1A
3B
1B
3A
1B
vi) G on O


Color 2
on
Color 3
2A
3B

2

3

Right to Left

1 , 3 , 2

1 , 2 , 3
2B
3B
2A
3A
2B
3A
Y – yellow (Color 1) on Sh 1A & 1B ;
G –  green (Color 2) on Sh 2A & 2B ;
O – orange (Color 3) on Sh 3A & 3B


While doing some research on macramé terminology, I came across a ‘Reverse Half Hitch Knot’ that is exactly like a reverse stitch !!! So, I guess, the only real contribution of this lengthy post is how one can convert it into tatting ??? Can you hear all this going down the drain ?! It pays to do one's research Beforehand ! 

Update : I just heard from Judith who has confirmed this : "Usha's applying these stitches to macramé, is like tatting reverting to its origin in knotting. :-) Both macramé and tatting use similar hitches, though in the early 19th century tatting was meant to resemble open lace by the use of fine threads.
She adds some historical trivia: The stitches early tatters used included 'reversed double stitch' which today equates to 'reverse order double stitch (rods)'. '
The Bath Tatting Book' (1865)
Anyways, I did it all in good faith & despite the time, effort, & repetitiveness, I kinda enjoyed the whole journey. I have Definitely learned something new & had tremendous fun weaving the braid, seeing the"waves" emerge, & then converting some more macrame patterns/stitches into tatting, including the Chevron stitch that i added towards the lower half of the bracelet. I even got better as the braid progressed ! The thread loops on either side, as well as all the stitches became more compact & neat.


Happy Mac-Tatting :-))


Motif #9 of 25 Motif Challenge