Friday 28 August 2015

Two Rakhi Bracelet Patterns

Pin It now!

YES, I wanted to share a rakhi/bracelet pattern for Raksha Bandhan.
One adapted pattern was ready during the Curled Rings phase in May (just didn’t get around to posting it). 2nd pattern was made during the Cluny Tatting phase (the GeomaTATic bracelet). (But haven’t been able to diagram & write it out properly).
Then one evening, while sorting out my tinies, putting them in another compartmentalized box, I began playing around with them. And thus was hatched another quick pattern which could work so well as a rakhi.

NO, I did not think of ‘bonding’ per se. But it was serendipity !!! Both patterns are a bonding of 2 very different patterns . 

Raksha Bandhan is celebrated traditionally by sister tying a rakhi on a brother’s wrist – a symbolic bond/undertaking. Literally, it can translate to ‘protection bond/binding’. Since we didn’t have a brother & Mom didn’t want us to feel ‘left out’, we tied it on our Dad’s wrist – he was, after all, the protector of our family! There are a lot of interesting historical episodes where non-relative bonding was resorted to, as a means of keeping the peace, seeking protection, joining of families/clans, etc. In recent years, the symbolism has extended to tying the band on wrists of soldiers & other protectors of law & order.
I wonder if feminists have a gender perspective on this ? Hmm ….

●●●●●●@@@@@@@●●●●●●  

Bonding a Snowflake with 2 Hearts (click for pattern)

A snowflake medallion in centre & a heart on the side looked good & the colours worked too. Quickly tatted up another heart & added the strings. Loved the symbolism of the hearts. And a good way to use up some of the motifs lying around.

Together, the 3 measure 3½” in length & about 1½” in width.
Anchor Mercer Cotton size 20 : Black, Blue – 0131, Variegated Blue – 4054-1210
Techniques Used : Thrown rings (rings on chain), reverse stitch (rs) (unflipped double stitch), Josephine Knot, Long Picot (LP).

Hexagonal Snowflake : a 2-shuttle pattern with thrown rings & 2 colours.
Magic Heart : 1 shuttle & ball, or 2-shuttles with only one small Josephine Knot on chain.
Strings : 2-shuttles [1ds, 1rs] repeat to desired length .
Tassels : optional
ds – double stitch ; rs – reverse stitch or unflipped ds or 2nd half of split ring stitch.

Depending on the colours one uses, it can be tatted in either 2 or 3 segments, joining as you go.
Version 1 : Make snowflake. Cut & hide ends. Start a heart at the base, climb up left side, join to snowflake at center, continue down right side. End with string to desired length. Repeat for 2nd heart at opposite end of snowflake.
Version 2 : Make 2 hearts along with the strings. Then start snowflake & join to hearts at opposite ends. Cut & hide ends.
Version 3 : Make one heart with string. Start snowflake & midways join to heart. Complete the snowflake, climbing out with a split thrown ring & mock picot & start the 2nd heart.

Since 2 of the 3 medallions were already in my stash, I did not add any beads. But beads & pearls would enhance the look, especially if used for Jewelery, either as a bracelet or a choker.
As you can see, it is a versatile combo -- use any motifs that one has lying around.
If one adds the string to only one side, it can be used as a Bookmark.
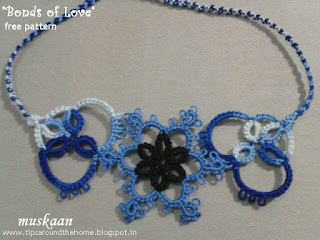
Choker ?!
Download Pattern here : “ Bonds of Love ”
I have inked the stitch counts on the diagram ;
for written pattern : Hexagonal Snowflake   and   Magic Heart

●●●●●●@@@@@@@●●●●●●

“Blossoming Bonds” Rakhi / Bracelet
Bonding a layered flower with a leafy braid ; 
also 2D – 3D bonding & freefrom with regular/symmetry bonding


Flower is >1” across. Length of bracelet/rakhi : 7” (12-13 repeats)
Red Heart Perle Cotton size 20 : Yellow – 0307 ; Rust Brown – 0341
Anchor Mercer Cotton size 20 : Green – 4054-0241
Techniques Used : Split Ring, Floating Chain/Curlicue, Auxiliary Thread tatting, Josephine Ring (optional), Curled Ring (optional)
Bead(s) as required. Findings as required.

Center Flower : I started out by making Jennifer Williams’ “Flower using Two Layered Tatting” here. But didn’t notice that the joining picots were to be very small ! Hence, decided to stop & do some course-correction to limit my losses. 
Instead of 7 repeats for each layer, I made 4 for inner & 5 for outer layers, keeping the original stitch-count .
Add a bead in centre (& wherever required)  (I had to add the bead later)
Thus it was converted into a rakhi or a bracelet.

Braid : The Leaf Braid, here, as modernized by Jane McLellan was on my to-tat list as well & thought it would make a nice foliage-y addition to the flower, instead of the usual strings.

1. Start the braid with a Josephine Ring (or a finding): 30 hs at one end
2. Midway through the braid, attach it to one end of a petal & also add an auxiliary thread to make the buds. Made one bud, with picoted calyx and add a dead-end curlicue.
3. Bud #1 : (3 vsp 4 p 4 vsp 3 ) x 3 . Join to adjacent picot & top picot *.
4. Calyx : A short chain with picots, curled around the base of each bud & joined to base.
5. Tendril : 1 dead-end curlicue till desired curl is obtained.

Using Curled Ring for Bracelet Clasp
6. Continue across & under the main flower, anchoring at a couple more points.
7. Make another bud at the other end, diagonally from the first bud.
Bud #2 : (4 vsp 3 p 3 vsp 4 ) x 3 . Join to adjacent picot & top picot *.
8. Tat over auxiliary thread to hide tail, continuing with the braid till desired length.
9. End with a Curled Ring (Option 2) at end (or a finding/clasp) : Ring 12 vsp 12, curl.
10. Cut & hide ends.

 NOTE : When making the buds, it is easier to make & join the ‘petals’ at the side picot of  previous ring. When making the last ring, pass thread through top picots of earlier rings at same time.

Since this is an adapted pattern, I have not shared the stitchcount here. Please visit the respective sites/blogs for free pattern :
Two Layer Tatting by Jennifer Williams
Leaf Braid by Jane McLellan

●●●●●●@@@@@@@●●●●●●

Happy tatting :-)

Motif #3/III for 25 Motif Challenge

Friday 21 August 2015

Cluny Tatting : Shapes & Effects

Pin It now!

“…where no man has gone before”

Okay, I may be exaggerating here, true to ‘form’ ;-P  But I have yet to come across tallies other than oval/spindle & long tallies. Safe to say that few tatters have gone this route.
Generally one comes across tallies that have 3 raised & 2 indented lengths (2 veins), made on a 3-Warp loom. It is also Oval or spindle-shaped. However, this is merely the beginning & the loom is our means “…to explore new worlds…”. Let the Shuttleship cruise over the Strings at Warp speed “…to seek out new…” shapes , forms, & effects … “…to boldly go where no man has gone before!”
 As you are well aware, my execution is never up to the mark. But I do hope the ideas shared here can be a launching pad for your countdown to new horizons .

Playing with Shapes, Forms, & Effects
in Cluny Tatting
The tally is no longer a statistical mark, it is now a ‘Cluny’ing glory !

Multiple (4/5/or more) Warp tallies are better suited for the angular effects, as well as to create many other shapes & effects. They offer more scope to play around with shapes. For Warp 4 & Warp 5 tallies, please refer my previous post &/or download the tutorials.

REGULAR  GEOMETRIC  SHAPES
(Polygons)
I started a tally-only bracelet with the sole intention of playing with different shapes & forms. And since I wanted to try out geometric shapes, I named it the GeomeTATic bracelet/rakhi. As I made them, I became a bit better at managing the shape by using little tricks, etc.

I. Flat  Base/Tip Tallies  
Eg. rectangle, square, triangle, hourglass, bowtie, hexagon, ‘inverted’ triangle, right angled triangles, .. 
The base & tip of a tally can be made flat with relative ease.
1. For flat base, keep the end Warps separated during the 1st few weaves. Pack down & the shape will stay. Similarly, for a wide ‘tip’, keep the end Warps at a distance when finishing off the weaving. The distance between the end Warps will depend on the width one desires.
2. Most importantly, when closing – keep the tally in a firm pinch/‘clench’ & DO NOT over-pull the closing loops. Tally edges have a natural tendency to curve when closing. Pulling too tight will change a rectangle or square into a barrel. Hence pull just enough to close all loops yet keep the ends flat & corners neat & angular.

II. Angular Tallies 
Eg. pentagon, hexagon, octagon, kite, diamond, Christmas tree,
Geometric shapes include angles ‘along the sides’. Some, such as a diamond, kite, or even a triangle are fairly easy to make by adjusting the Warp distance during weaving.
It is the pentagon, hexagon, octagon that I found troublesome; the angles tend to curve.
Problem solved by use of Slip Knots in smaller sized thread. I used size 40 white thread slip knots.
To make it easier, after the frame is ready (Warps are laid), make the slip knots & attach them to the required Warps, usually the extreme ones. When the need arises for an angle, simply bring the slip knot down to that point & continue weaving. After tally is finished , hold the knot threads on either side & give a tug outwards in order to pull out the angle slightly. Then cut off the knots.
I was successful in getting a good angular pentagon & hexagon, but failed with octagon, although another attempt/practice might have proved successful.

NOTE : Penta- & hexagons require 1 slip knot at each of the end Warps; Octagon requires 2 at each end Warp.

3D TALLIES

III. 3D tally with bead  .
As used in Star Anise Studs here .
This is a fairly easy, very basic application of both bead & Cluny tatting.  Load beads on any shuttle. Make a tally. Bring bead forward before starting the next tally. When 2nd tally is closed, Lock Join at base of 1st tally to get a 3D effect.

IV. Tally with Tatted Beads
This is still in a very nascent stage – just an idea I played with. It could perhaps work for a cactus, or tiny buds on a grass lawn !
Inspired by Ninetta’s tiny tatted beads. I didn’t quite get the effect I had visualized, but then I was using size 20 thread. However, sharing the potential & possibilities …
Collage.
Tat the beads on Weaver thread, spaced out, before weaving the tally (I made them after I’d already started the tally!). Each ‘bead’ is a ring of 3ds. Try Josephine knots for a better effect. Continue normal weaving & close as usual


V. Curled Cluny Leaves  Warp 3. 
Remember Ninetta’s Curled Rings ? If rings can be curled, why not tallies ? Here’s the process & result …
     

VI. Curled Cluny Leaf with Bead within    

A) Hold bead on long loop of Weaver shuttle in center of tally (notice half tally has been woven already);
B) hold with paper clip (safety pin used in pic) ;
C) when closing, position the bead, pass SH1 through loop over bead And through the base loop & pull close as for curled tally.

FREEFORM  SHAPES  &  EFFECTS

VII. Freestyle Leaf 
In a normal Warp 3 loom, by merely adjusting the space between end Warps, one can create an uneven edge. A classic spindle/oval tally is made with an inverted triangle for base, a square or rectangle for centre/body, topped by another triangle. Play with the weave counts or the Warp distance, add more weaves to taper the tip, & one can get a more natural leaf-like form. The ‘3D’ tallies in the Star Anise studs above, are also made in similar fashion, hence no 2 tallies are identical.
The collage includes images from my 2-in-1 Wiosna Doily & Frauberger Bookmark tail (in size 40) . The central purple one is 3-veined (made on a Warp 4 loom).
All these images are from my very first attempts at Cluny tatting & need a lot of refining.
The same technique can be used to make a matka (earthenware pot) or a fish !!! (matka in lead photocollage. If the base is tapered, it can become a Fish !)

VIII. Split-end / Uneven tip Petal  
(Same technique repeated for Arrow …)
I wanted a split-end petal for a particular flower I had in mind to tat later. Would it be possible with a multi-Warp tally ?
A while back, Teri Dusenbury had advised me to make copious notes. I try. I start off with gusto, then get so involved in the tatting (or circumstantial interferences) that I forget to jot down the latter portions, relying on my Excellent memory ! Yeah, it Always fails me ;-P Happened yet again. I had very quick  sketchy thoughts mingled with notes of the trials, hence had to rework in order to confirm before posting.
The images show all my efforts on this front. Please refer here for Warp 5 loom & weaving (download free tutorial pdf)
Trial A. Warp 5 loom. Stop 1st  pass (right to left direction) at Warp 3 & continue weaving between Warps 5, 4, & 3. Close as usual.
Failed – the long tip on right curled inwards.
Trial B. Not quite sure what I did here, except perhaps to close the tally less tightly than before.  
Failed – I did get a stepped effect (another experiment ?!) but not a good ‘split’.
Trial C. Make a reverse stitch on the middle Warp where the split begins.
Failed – Still did not address the length of Warp threads across. Au contraire, made them more prominent.
Trial D. Finally wondered whether ‘splitting the closing’ of loops would be possible. So, at the split point, I pulled down loop 1 (at ‘C’) to close ‘AB’. Left it at that & continued weaving on the remaining 3 Warps (3, 4, 5). It worked !
Trial E. Confirmation of Trial D because I hadn’t jotted this final trial down.  Shown from front as well as back – no thread spaces visible & a clear uneven/split tip seen !!!

IX. “Rolling Lattice Leaf” 
Combining Cluny tatting with Roll tatting can give a lattice effect !
A Warp 5 frame was used since I was working with size 20 thread & needed space for the lattice to show. Between each roll tatted segment, I made 3 passes with weaver thread to bring shuttle to opposite side. (2 passes make 1 weave. Refer table here

TIP After each rolling segment, suspend the weaver shuttle to untwist.
(Another idea to try : Make only 2 passes/1 weave between roll tatting segments, thus bringing weaver shuttle back to same side each time. It should create an open fan or peacock feather shape! But closing this uneven tally would probably pose a problem)
 In latest trial, on a Warp 5 loom, Only 1 pass was made after each roll tatting segment, bringing the SH1/weaver shuttle to opposite end. I got a 3D open lattice leaf when closed!

X. Rolling Cluny Braid/Vine  
But is roll tatting possible on the central Warp(s) too? 
This time, on a Warp 3 frame, after every 3 passes, roll tatting was done consecutively on each Warp. I was trying for a 3D braid/vine effect .

XI. Hanging & Split Tallies on Warp 4. 
Bead within a Heart - 3D effect
When I tried my very 1st Warp 4 tally, the threads came out at opposite ends ! (see inset) I thought it was a mistake, but as later research showed, it was actually a Split Cluny, but 3-veined !
Along the lines of the normal Warp 3 frame, one can figure out how to make Split & Hanging Cluny leafs in multi-Warp looms, too.
In image, I have used a Warp 4 Hanging tally on left side, placed a bead in the SH1 shuttle thread in center & made another Warp 4 tally on the right side, thus encapsulating the pearl between the 2 leaves. (HCL was required to bring both threads to base; normal tally brought the threads back up; auxiliary weaving thread for HCL was hidden within the right tally). And both tallies are shaped like a Snake Charmer’s flute : long narrow ends & broad circular centre.
TIP : When making narrow ends, as in the flute (been/pungi) above, keep them short. Otherwise closing the tally, especially if made on a 4 or 5 Warp loom, becomes quite difficult.

XII. Padded  Tally 
This was just a thought – using multiple threads for each Warp of the loom – would it affect the look, thickness of the tally? It didn’t alter the look by much.
But it has potential in another application : 3-SHUTTLE TATTING & encapsulation !
If working with 3 colours/shuttles, one can hide the nonworking thread within the tally just as one did for hiding the tail within tally here) but All 3 threads will emerge at the same/desired point, And keep the veins balanced ! 


Thumb Rule : When using the same thread, the number of ds in a ring = number of weaves in a tally , to achieve same size.
Therefore a 16ds ring (8-8, or 4-4-4-4, …) can be substituted with a 16 weave tally leaf !


FACTORS that may affect shape, form, appearance
·         distance between Warps (slim/narrow or broad)
·         number of weaves/wraps (short or long)
·         tautness of weaves/wraps (loose or tight) – can affect appearance, width, & shape, as well as closing the loom.
·         density of weaves/wraps (closely or loosely packed down) – can affect appearance, especially margins when loom is closed.
·         number of Warps (width)
·         thickness/size of thread for loom in HCT (width or central vein, if thicker thread used)
·         moving the outer Warp threads while weaving can alter the shape, width, etc. giving unconventional, freeform leaves.
·         Position of tally on artificial loom : low down (pointy tips & slimmer tally) / midways (ideal for classic tally shape) / high up (broad base & body)
·         I discovered that thread plays a really important role here. A smooth sliding thread makes it easier to close tallies, especially with multiple Warps.

My experimentation , though incomplete, halts here for the present. I still have to try out 2-coloured tallies.    
Dagmar Pezzuto has some intriguing patterns & techniques that I will try out at some future time.
I thank you, my readers, for your patience in reading through (if you have ;-P) … hope you found the ideas interesting ….


A few more resources :

Patty Dowden’s Tips on Shaping Cluny Leaves 
Cinzia Gabrielli's  Coloured Hanging Clunies  … diagrams & instructions
Dagmar Pezzuto's Cluny Petal Tatting in Two Colours.  
Pattern using 2-coloured Cluny tatting … downloaded. Uses 3 shuttles – 2 with same colour, one with different colour.


UPDATE
Check out my new series of Colour Cluny Tatting pictorials, with lots of free and practice patterns https://tipsaroundthehome.blogspot.com/p/my-tut.html


Related Posts : Cluny Tatting Tips
Free patterns : Braids ; Studs


Friday 14 August 2015

Broadening our Horizons

Pin It now!

Broadening our Horizons !

I have been reworking this post countless times, & still not satisfied :-(. Fact is, after all stepwise pics were taken & notated, and the post drafted, I figured out an easier way of closing multi-Warp looms/tallies. So took more pics & notated those, too. However, there seemed to be a lot of confusion because I couldn’t sync the earlier & latter sets together. Posting as separate sections would increase length and redundancy . This unhappiness made me procrastinate for many days, till I decided to take a fresh set of photos of the entire process in one go. So far so good. But then Another option to make 4-Warp frame loomed on my restless brain ! Had to take pics & notate those as well. Ultimately, the number of pics was still too large, causing me to compile them in 2 separate pdf files – for Warp 4 & Warp 5 Cluny tatting. Please excuse my mistakes or omissions.

So here it is – my way of making the multiple-veined Cluny leaves , with an additional step …

“What seems to be the problem, Scotty ?!”
Most tutorials on Cluny tatting, irrespective of the loom, tell you to remove all the loops after the tally is complete, move the loom shuttle & weaving shuttle aside, identify the right thread to pull, & then start to close each loop in sequence.
This is not too difficult in a Warp 3 loom where only 2 loops need to be closed. However, as the Warps increase, the loops tend to overlap with each other when the loom is being set up . The loop made first also needs to be closed first. But later loops/thread get stacked over it, and need to be placed aside before closing can start. Hence, at closing time, there can be a lot of confusion if one removes all the loops and Then starts to close each.  Shivers!
Battleground Closure ... just before actual battle !
.... and this is when I have pinned down all the loops for taking a decent photo without harming the tally. Imagine trying to keep them all in their place, closing one at a time, trying to identify which thread to pull, all this while holding on to the tally in one hand !!! Violent jitters & shivers !
 "What are we looking at, a 20th century Rome?" 
-- Kirk (Bread and Circuses)

“All fixed now, Cap’n”
As they say, a step(!) in time …. Turns out, all it requires is ‘One Small Step’ ‘Behind the Scenes’ where the Space Shuttle passes under the horizontal bar/loop
A Warp 5 loom from front
This is the usual way loops would be stacked
This is how the loops should be stacked !
Why ? The reason lies in the Sequence with which each loop is closed. In earlier figure, one can easily see that the loop which needs to be closed 1st is ‘blocked’ by the next loop which is stacked over it ! While closing this loop, the others will get in the way.
So, if one has to start closing, one will have to first pull off loop EF to get to AB. But EF is ‘blocked’ by I ! So here’s the messy path : remove I , then remove EF, only Then start to close AB, while the former flop about. Shivers violently !

And it becomes quite loopy – loops flopping about, messy, confusing, tendency to knot/twist. 

"Just before they went into warp, I beamed the whole kit and kaboodle 
into their engine room, where they'll be no tribble at all." 
-- Scotty, explaining how he got rid of the tribbles (The Trouble With Tribbles) 

One Small Step behind the scenes !
Here is the step , shown on a Warp 3 loom (translucent sheet used as loom to show path)


This extra step can be effectively applied to normal 2-veined (Warp 3) tallies as seen in the pics above. In a finger loom, however, for Warp 3 it may be prudent not to, since the AB loop across middle & ring finger acts as a kind of support for the central Warp. However, as number of Warps increase, it is advisable to take this extra step.


“Lt. Uhura, co-ordinates of the flight path, please”
As mentioned in my earlier posts, this card loom is designed by Judith Connors. I have only increased the number of slits at the top & bottom to include more Warps. Also, the same loom came in handy while making the hanging cluny leaf & split cluny. Please note, the concept remains the same ; any loom, Including Finger Loom, will perform the same function .. I just happen to have used this first & am really happy with it.
  • So now, the adapted loom has 5 slits on the top edge & 4 slits at the bottom. One slit at the right side to anchor the loom shuttle/ball thread (The shuttle can also be anchored behind the last slit it exits as shown in Tip #2 here , or in any of the empty slits or on the slit in the right side.
  • The top edge has 1 extra slit on left side where the 1st Warp starts. The bottom slits can be synced to the top, or be closer together in a converging fashion at the center of base edge. Simply cut the additional slits parallel to the existing ones (if inserted in the same original slits, there will be a great deal of overlapping & messiness when closing).
  • Loom thread moves vertically in the front , & horizontally at the back.
  • Vertical movement in front forms the Warps & is indicated by capital letters.
  • Horizontal movement at back forms the loop & is indicated by small letters.
  • Sequence of letters from A, B, C, … & so on indicates the direction & sequence that the loom Shuttle will follow. Thus SH2 goes in through the slit at A & comes out at B ; goes down to C & up through  D, and so on for the number of Warps required.
One can work out the sequence for ANY kind of tally, once the concept becomes clear &/or some practice is under one’s belt. Just try to figure out the sequence of loop closure (eg. when I pull this, that loop closes & so on), & that will give you an idea of where the threads will emerge after tally is closed – will it become a regular tally (both threads emerge at top), a hanging tally (both thread emerge at base), a split cluny (one thread emerging at either end), or a 3- or 4-veined tally.
  • The Warps should remain taut/tensioned. This serves 2 purposes : 1. to keep the weaving even & consistent ; 2. to pull up the top edge of the card, so that there is plenty of space to pass shuttle to & fro for weaving. (this lift can be inferred from the shadows thrown by the Warp threads in many pics)
TIP : If any Warp comes a bit loose, it can be tightened easily by tugging at the thread segment that follows immediately after it ….on till the anchoring point. 

This is only One way of making the Warps. A Craftree member & I simultaneously figured out how to make a 4-Warp tally, but by looping the Warps differently ! I haven’t tried the other, but what I like about my method is that the initial looping remains Constant irrespective of how many Warps one wants. Hence much easier to remember – both while making the frame, while weaving, as well as while closing the tally.

For purposes of brevity, I have set up the stepwise pictorial (& instructions) for each in separate pdf files . The pictorial shows steps required for setting up the loom (including the extra small step, along with simultaneous views of the back), & then the sequence to close the tally after weaving.


“Mr Sulu, Warp four straight ahead, please”
WARP  FOUR (gives a 3-veined tally)
Version 1


Version 2 

Click to download Cluny Tatting on a Warp Four Loom (both versions). The tutorial includes step-by-step pictures, as well as instructions on Setting up the Warp 4 loom,  Weaving & equally important , the Ckosing pathway !


My very 1st Warp 4 tally was a Split Cluny (which I didn't even of then!) , with the loom & weaving threads emerging at opposite ends. I didn't jot down that sequence, but have recently made a Hanging Warp 4/3-veined Cluny leaf. Sharing the WIP photo  (it is not include in the pdf).

TIP : If one is using a finger loom for multiple Warp tallies, I would suggest using 2 different coloured paper clips one on each of the 2 base loops. This will help in identifying which loop belongs to which Warps, when closing time arrives.


‘Mr Sulu, Warp 5 full speed ahead’
WARP  FIVE (gives a 4-veined tally)
I used a translucent plastic sheet for this loom, so that the shuttle movement behind the scenes can be captured easily. However, not recommended for actual Cluny tatting, since the slits are pretty sharp & do not allow easy adjustment of Warp tension, etc.
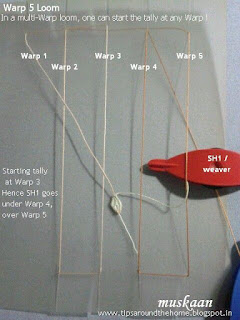
TIP : One can start weaving a tally from Any Warp, not necessarily the extreme left one. Merely keep the under-over movement in mind. The above photo shows the tally at Warp 3 & SH1 under Warp 4, over Warp 5.  With SH1 now at extreme right, start normal weaving)


Click to download Cluny Tatting On a Warp Five Loom  Includes complete tutorial on loom/frame, weaving,  and closing sequence. 


Why Increase the Warps ?  
Out of curiosity & a challenge initially ! It is one way of  broadening/widening the tally, but keeping the inter-vein distance short, even & constant. The additional veins also impart their own beauty & fineness. 
Multiple Warps become essential for creating various shapes & effects of tallies, too (something I will discuss/show in my last post, along with many little tips & tricks)


HIDING  TAIL  ENDS

In case one needs to hide thread tails within a tally, it can be done as shown in the collage. The shift from one Warp to the other after a few weaves ensures that the tail gets locked in. I learnt this when in my earlier attempt here, if I pulled at the ‘hidden’ tail, it could still slide ! However, by shifting, the tail becomes secure. After snipping closely, it is not visible at all. 
(While testing, I kept tugging, thus leaving a telltale crossover in the front. My mistake.)

Heartiest thanks to All those wonderful tatters who shared their 
bounty of knowledge & skills with us. 
Where would we be without them – no lift off possible !!!


Related Posts : 12 Cluny Tatting Tips

Tuesday 4 August 2015

A Loom for All "Clunies"

Pin It now!

A loom is your oyster. With the right choice, one can belt out beautiful pearls
in the form of tally leaves & petals !

After some initial tallies made on my finger loom I switched to Judith Connors’ Cluny Tatting Loom for all the rest of my practice, trials, & experiments. I sincerely thank her for sharing her loom , without which I’d have faced many limitations.

The copyright for this loom belongs to Judith Connors. Hence I will not share the dimensions, etc. of the card loom, although all looms are basically the same functionally & one can follow their instructions too (listed at end of post). In 2 posts, I will share only my own way of using it to make various kinds of tallies, which, so far, I haven’t come across. I can’t thank Judith enough for sharing her expertise ! 
  
I made the loom from a good sized piece of cardstock. It is sturdy yet pliable : place it on any horizontal surface & while weaving, I allow the card to curve a bit (from the top edge). This gives the shuttle plenty of space to make the passage to & fro ! A smaller loom (see Judith's tips below) becomes much more portable. But since I can no longer tat on-the-go, my ‘larger’ loom works splendidly. Moreover, I cut more slits along both edges, top & bottom, of the card This allows a great deal of flexibility in use --- the SAME loom can be used to make hanging tallies, tallies with more than 2 veins , and so on ! Truly a loom for All "clunies" :-)

TIPS from Judith Connors : 
Use a pencil to raise all the threads above the surface of the cardboard, like the bridge of a violin”. (post #5 here
“The measurements of the loom may be enlarged or reduced, even to using an old credit/loyalty card. … once you have the gist of the technique, one can reduce bulk in one’s tatting bag/box by creating the smaller loom” (here)


◆◇◆◇◆◇◆◇◆◇◆◇◆◇◆◇◆◇◆◇◆


HANGING   CLUNY  LEAF   ( HCL )
My main attraction towards Cluny tatting has been in their potential & beauty in freeform & dimensional tatting. They can take such wonderfully natural leafy or petal-like shapes ! And of course, as I later realized, many polygonal shapes as well.

A hanging cluny is like a tatted ring in the sense that after the tally is made, the threads all emerge back at the same point from they started viz., at the base. Besides their appearance, they are functional too, & can bridge a gap (as in my 2-in-1 Wiosna) .

In the tuts that I consulted, either a floss threader was used (which I could not acquire, despite getting my DH on the hunt), or the centre loop/Warp made with thread or dental floss, was left ‘unsecured’, making it a bit floppy to handle & pack down.

Additionally, in case one is using auxiliary thread to weave, too many threads hang down in a finger loom . 
So here’s my easy solution :

Easy Hanging Cluny Leaf on a Card Loom
Following is a pictorial of how I applied the card loom for HCL . I used a size 20 AMC thread, doubled up to form a loop & knotted at the tail end. One can insert the loop into the slits & then place the knot so that it gets anchored behind as in Tip#2 in previous post. ( Many more tips are covered in the same post).


Since the weaving thread needs to be pulled out through the base when the tally is complete, one can use another length of auxiliary thread. Or, one can unwind the shuttle & allow the entire length to pull through. It is obviously advisable to use shorter lengths of weaving thread for hanging clunies.
All closing is done by gentle pulling .
The tiny space of weaving thread loop is left so as to avoid ‘locking in’ as well as to keep leaf shape from getting distorted while closing. This is also the loop that can form a picot (see below) .
This was my very first HCL. Hence, while closing it, I did not take pics of individual steps. I have tried to indicate with help of colours, numbers & arrows. But for a clearer understanding, there are Excellent tutorials by Karen Cabrera & Ruth Perry from which I learned . 

I often tend to leave the loops on the loom till it becomes absolutely essential to remove & close. The loop(s) that are not being closed can stay on the loom, instead of coming in one’s way. Also, then I don’t need to pull & check which thread needs to be pulled next, because the loops are already in their sequence on the loom. This is Really handy when making tallies with more than 3 Warps.
It is easier to weave HCLs with a darning or tatting needle, since short length of auxiliary thread is required !

Potential of Hanging Cluny Tatting :
Great stash buster – use up short lengths of scrap thread as auxiliary thread to weave leaves.
Colour Spectrum – the same motif/piece can have tallies in different colours !
Picots & Beads – One can add a picot at the tip of the hanging cluny leaf if one needs to join to it later. Beads at the tip or within the leaf ….
In order to demonstrate how I made a picot, I started a tally. But then decided to carry on to make a complete piece. Although the colours are not right, it is a Cluny tatting variation on my Rustic Leaf pattern here. But I did jot down the stitch count, etc. & will share it soon. Again, this is only a practice piece, but I won’t have time in near future to do it properly …


All Hanging Cluny leaves as veins, joined at base by Josephine Chains 
& at tips by padded ds tatting for 3D effect

UPDATE : Ninetta Caruso has shared another way here, of making picots along the edge of the Cluny leaf ... by making a reverse stitch (unflipped ds) with picot space between the 2 hitches, on the loom thread !
◆◇◆◇◆◇◆◇◆◇◆◇◆◇◆◇◆◇◆◇◆

SPLIT   CLUNY
Why do I pin, if I don’t go back to refer to them ?! A few months back, I had pinned an image of a tally being made. Back then I had no concept of the various forms/techniques involved; it just seemed like a great stepwise pictorial for the future reference. Now, as I scrolled through my Pinterest Board , & went back to the site, it turned out to be a ‘3rd kind’ of tally viz., the Split Cluny !

Split Cluny method was developed by Melanie Blowers, a student of Mimi Dillman. Mimi has a neat pictorial with instructions on how to make them , and also various tips & functions related to them .  

It just so happened that I Needed to use this technique to correct/rectify an error almost immediately ! I was playing with a Cluny tatting bracelet (tentatively called “Geometatic” Bracelet/Rakhi). All tallies were regular tallies. But while closing one of them, the middle loop refused to budge. It wasn’t yet ‘knotted up’ but I was scared the thread would break if I pulled too hard ; so I emptied the loom shuttle and pulled this last thread ‘tail’ through the other end. Finally, with gentle persuasion & perseverance, the open loop yawned to a close, but too late : I now had the loom thread & weaving thread at Opposite ends of the tally !
After some thought, I added an auxiliary thread with weaver’s knot, made the loom with this auxiliary thread, & started the tally weaving with the ‘original loom thread’. One of the tails was hidden in the back while weaving the tally. Never hurts to learn a new technique ;-P


◆◇◆◇◆◇◆◇◆◇◆◇◆◇◆◇◆◇◆◇◆

And one can hide the tail within a tally, as I mentioned in Tip #12 in previous post. Since there wasn't a pic then, I've added one here :
Keep the tail parallel to the left or central Warp while weaving, treating both tail & Warp thread as one. 

◆◇◆◇◆◇◆◇◆◇◆◇◆◇◆◇◆◇◆◇◆

Now for la pièce de résistance .....  
A  Lego  Loom for Cluny Tatting !!! 

My DH hasn’t been able to suppress a wry/amused smile, watching me weaving on the card loom (I keep him abreast of a few terms ;-P); even teasing me at times. Yet, watching my ‘focus’ & movements, his engineering brain kicked in & he asserted that other materials could be used. Here’s what he immediately came up with : an electrical connector ! 

Great idea but it needed to be steadied because the Warps need to be taut. So this would have to be glued down or nailed down to some board.
But don’t you see something else here ? Yesssssss ! A Lego block !

  • Make a loom with blocks stacked up higher on one end of the board & lower at the bottom end (this will provide the height/lift for easy passage of weaver shuttle), 
  • wrap the loops for the Warp around the little knobs on both ends of the loom blocks, 
  • place blocks over these to 'lock in' the Warps, 
  • and weave away. 

It is so versatile, can be assembled/dissembled at will. Distance between Warps And the number of Warps can be easily changed …. Game anyone ?!

◆◇◆◇◆◇◆◇◆◇◆◇◆◇◆◇◆◇◆◇◆

My final post will cover Shapes & multiple veins , and the factors that can affect tally shapes.

Tally Ho  &  Happy Tallying :-D

◆◇◆◇◆◇◆◇◆◇◆◇◆◇◆◇◆◇◆◇◆

More Links to Cluny Tatting
Various Types of Looms & tuts 
Hanging Cluny Leaf

Split Cluny


◆◇◆◇◆◇◆◇◆◇◆◇◆◇◆◇◆◇◆◇◆


Related Posts : Cluny Tatting Tips