One can
never have enough bookmarks ! And I have been itching to tat one for quite a
while. Hence what started out as a practice braid out of curiousity, got extended into a bookmark for my
latest book.
Rings
and Curves Variation
Braid
to Bookmark
Original
braid : 'Rings and Curves' by Elaine P. Gan
Variation
: Judith Connors, on Craftree

This
variation of the braid pattern was shared by Judith on Craftree as part of her
description of & practice for Elaine’s Reverse Join (“The handy reverse join”). I have used the RJ frequently since the Wiosna doily & prefer it to
the SLT (shoelace trick/overhand knot).

So
here is my practice piece of the braid which I later decided to extend to a full
bookmark.

Having used leftover green thread, it soon ran out. So I
used Ninetta’s ‘elementary’ technique
to add the chain thread and it felt a bit like deja vu. Loved the ease with which the thread was added & no ends to sew!
It was interesting to do directional tatting (RODS) in this braid - the changes were made in blocks of elements, just as in the Spinning Wheel mat
With the
main body length completed, I had to think of a tail. A lock chain would be too
narrow for this braid. The tail needed some width to be proportionate to the
width of the main body. Picots on both sides !
UPDATE: Pictorial for the Picoted S-Chain -https://tipsaroundthehome.blogspot.com/2020/04/picoted-s-chain-cords.html . S-chains are a variant of the zigzag chains.

Yes, it is
not a pearl tatted braid, but a S-Chain with picots. And the S-chain is a
simple extension of a lock chain with complete stitches. Refer samplers # 10-12 here for comparison. I love how the stitches are diagonal to each other !
The tail
still felt too narrow; so I decided to go for 2 tails & snipped off after
desired length. And as always, the NanoMoment you snip, there comes this Big
brainwave sweeping in all kinds of regrets !
Why have 2 separate tails ? Why not have them interlaced ?! I could’ve
simply turned back ….
Oh well,
damage was done. Reconnected threads to base & started 2nd tail,
intertwining it with the first. Here, I used Martha’s ball thread join (explained in her Butterick Butterfly Bookmark pattern) to mask the links & keep the picots
seemingly intact.
Look
carefully & you will notice a green join on the lower left overlap & a
pick one in the upper overlap.
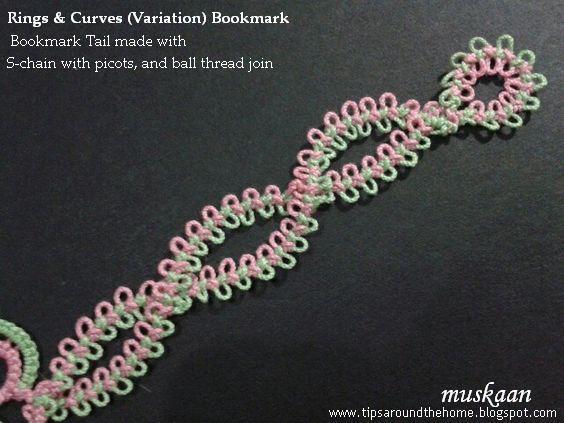
Threads used : Anchor Mercer size 20 Art 4054.
(pink – 052; green – 0241)
Measurements : Main body – 5½” x 1¼” ; Tail – 4 “ x ½”
Techniques I used : 2 shuttles, RODS/directional tatting, reverse join,
S-chain, ball & thread join, adding new ball thread in a chain

Without planning it, this bookmark has 2 adaptations/variations of the lock join – the reverse join & the ball thread join. The latter is already covered in Part II of the Joins series, & the former will come later.
My Observations/thoughts on Reverse Join :
- RJ eliminates the visual dip
caused by a lock join, and another dip when using SLT (I am not a fan of SLTs).
Due to the encapsulated thread, no dip is produced.
- There will remain a colour blip
which can be incorporated as a design element.
- RJ is much easier to undo than
a traditional LJ, because of the encapsulated thread.
- In the bookmark, I deliberately used a down loop throughout to make the RJ. And since I was tatting fs/bs, some of these turned up as up loops. It doesn't change the spot of colour, but it Does change how the colour bar appears !
I enjoyed tatting this braid to bookmark - although only rings & chains, it needed one's attention. Another page in my learning turned :-)
Many thanks to all the wonderful tatters named in this post -
you enhance my learning at every step !
Related Posts : Shuttle 2 to the rescue
Love the cute bookmark and I was thinking it would be a beginning to a hankie edging. The s chain is fascinating reminds me of a smaller version braid my mother used to buy for upholstering chairs when I was young. We have used it on many other projects and now I wonder if could use in a doll house :) Sorry you got me wondering and off the subject :) have a good day hugs from Carollyn
ReplyDeleteAh, I think I know what you are referring to, Carollyn ! Had the same thought. And forgot to mention that there is an elasticity to that chain - it was fun tatting it, though needed care with picot lengths.
DeleteI like your edging idea too :-)
Pretty bookmark and I really like the tail! Have to look at it twice to see that it's not pearl tatting. Interesting.
ReplyDeleteI call it the lazy tatter's faux pearl tatting, Jane ;-) Can be done with just 2 shuttles/threads, but gives a double-sided tatting effect.
DeleteLovely bookmark and a very unusual tail, nice to see something different, love the colours
ReplyDeleteMargaret
Beautiful bookmark!! And I love the tail!!! :)
ReplyDeleteThanks a heap Margaret & Sue :-) I like the tail, too, and it is also has a very distinct tactile appeal ... Hope you try it some time.
ReplyDeleteThat braid does make a beautiful bookmark! I'm fascinated by your process of making the tail, which looks perfect to me. I'm seldom happy with the tails for my bookmarks. I guess I have some experimenting to do!
ReplyDeleteThanks Diane :-) Come to think of it, I seem to have tried a lot of different things for bookmark tails, depending on what would go with the body pattern. Tails become just as much fun then
Deleteanother beautiful project Muskaan. It looks very difficult to me but oh so pretty!
ReplyDeleteThanks, Suzanne :-)
DeleteIt is a tad beyond beginner level, even though it's only rings & chains.
Lovely bookmark! This encouraged me to sign to Craftree. Thank you Muskaan!
ReplyDeleteHow exciting, Marja ! Will look forward to meeting you on Craftree :-)
DeleteThis is a gorgeous piece! And I'm happy to say I found another blog to follow! I've included the link to my own blog if you wish to check it out :)
ReplyDeleteYou just have to click my name.
DeleteThanks Meagan :-) I checked out your blog & love the tat-alongs and other stuff going on there. Will add your blog to my list, too . We can never have too many blogs ;-)
DeleteI love it! I was curious about Martha's ball thread join, but the link didn't work.
ReplyDeleteThank you so much for bringing it to my notice, Eliz. I checked, & the link url is correct, but it works only through Martha's pattern page here : http://marthas-tatting-blog.blogspot.in/p/patterns.html Butterick Butterfly Bookmark I will update both posts. Someday I hope to make the bookmark, now that I am comfortable using embroidery thread :-)
DeletePlease tell me how to do the s chain
ReplyDeleteLovely !!! Would like to learn how to make s chain. Please help
ReplyDeleteHi Madhur! I will email the steps this evening or tomorrow - easier to type on compy, with fewer typos 😄
DeleteIf you are in a rush, practice direct tatting a chain with picots at intervals. It's the same concept.
DeleteThis comment has been removed by the author.
DeleteI dont understand unless I I'm taught in person or unless there re step wise pics
DeleteFelicitaciones por tan hermoso trabajo.Imposible para mi entender como se finaliza este marcador de libros .Mi nivel de inglés es muy precario.Saludos desde Chile..
ReplyDeleteThank you so much, Anonymous from Chile💕, and sorry you could not understand. Perhaps this pictorial will help - https://tipsaroundthehome.blogspot.com/2020/04/picoted-s-chain-cords.html
DeleteI think the problem is that there are two patterns, neither of which is exactly explained. It would be better if you would separate the two oatterns and make a straight forward explanation of each without the asides about your random thoughts, interesting though they are. RThey do not help to understand a pattern. Barbara Carey A frequent reader 10/5/23
DeleteSorry for the typos!!
DeleteWhat can I say, Barbara, I have a tendency to ramble 😜🤣 The pattern is not really in public domain, hence I wanted to be careful of not revealing too much inadvertently. What I wanted to share is the process and several little tweaks I employed or experimented with. You will find the pattern or a more direct discussion in the Craftree link I shared.
DeleteThanks for your thoughts, appreciate them ... keep commenting 💕